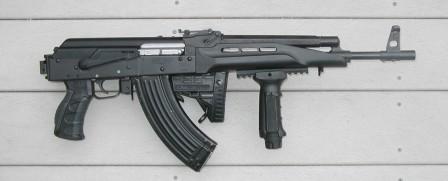
This page is going to cover some of the finer points of converting a Saiga sporter rifle to an AK configuration.

        The basic info for the conversion can be found on this
website.   I have also converted those instructions into a PDF file (easier to print and use during the conversion) - email me if you would like a copy.

        Any conversion of a Saiga will have to conform to the requirements of 18 USC 922R. Click here to see my layman's guide to understanding 922R.

Conversion Parts

There are some basic parts that are required for any conversion. They include:
- Fire control group (trigger, hammer, disconnector)
- Buttstock
- Pistol grip and pistol grip nut
Other common (and easy) parts to replace include:
- Handguard
- Gas piston

If you want your Saiga to be able to use standard AK mags, then you will also need to install a bullet guide.

I'll go over some of the parts options in a little more detail.

Fire Control Group

The stock Saiga uses a unique FCG, so you will need a replacement group. The most common parts are from the TAPCO G2 FCG. Each part counts as 1 compliance part for 922R. At around $30, the TAPCO set is a good deal. There are also more expensive FCG's, like the Red Star, which are excellent but run closer to $90.

The TAPCO hammer may need a little "work" to get it to operate smoothly. It's not uncommon for the bolt carrier to get hung up a little bit on the back of the hammer. You can cycle the action a few thousand times to wear it in, or you can spend a few minutes with the Dremel taking the profile down a little bit. Just make sure that you don't remove any material from the portion of the hammer that actually strikes the firing pin!

Buttstock

Your options for a buttstock are almost limitless. This is one of the typical 922R compliance parts, but there are a lot of nice Eastern European options that you may want to consider. Just keep your compliance parts count in mind when you decide.

There are two options for mounting a buttstock. One is to use a stock that has the standard AK profile for a stamped receiver. That will insert directly in place of the sporter buttstock and attach to the rifle with 3 screws.

If you want to consider other options, like a side folder or collapsible stock, then you will need to install a receiver block. The most common (and highest quality) receiver blocks come from ACE (www.riflestocks.com). There are two styles of receiver blocks: internal and no mod. An internal receiver block will require you to remove the upper tang from the receiver (the small, oblong piece that extends off the top of the rear receiver and provides one of the attachment points for a standard buttstock. On a Saiga, the internal block will also require some profile shaping to fit past some of the rivets - particularly the one holding the bracket for a scope mount. Once you cut the "dang tang", you are committed!

The other style of receiver block is external and does not require any modifications to the receiver. The down side is that it protrudes farther from the rear of the receiver and it can look a bit "odd".

Once you have the receiver block installed, you can consider the mounting attachment for your stock. ACE sells a side-folding block that bolts right onto the receiver. They also offer a CAR stock adapter which allows you to install any standard AR-style collapsible stock. You can also use them together, which is what I did on my 7.62x39 conversion

There are also combinations available that can add a pistol grip and folding stock without the need to modify the FCG. One is Russian made and the other is US-made (by ACE). Just remember that once you add that, you will have to comply with 922R, which means you need to find at least 3 other parts (4 if you have a foreign muzzle device) to  swap out to be compliant.


Back to Home Page
Back to Home Page
Pistol Grip

Like the buttstock, your options for the pistol grip are pretty open. Again, it counts as 1 compliance part so if you choose not to install a US-made grip, you still need to meet the requirements of 922R.

One thing to bear in mind is that most pistol grips do not come with the pistol grip nut. Most of them will have the grip screw, but you will have to order the nut separately. Remember that when you are ordering other parts and throw it into your shopping cart. Otherwise you'll end up paying $8 shipping on a $3 part!

Handguard

The Saiga comes with a plastic handguard. There is nothing about the conversion process that requires you to replace it. In fact, I kept my factory handguards and just had them modified (vents, accessory rail, profile shaping) and I think they are better looking than any of the replacements.

If you choose to replace the handguard, remember that the Saiga set up is different than a standard AK. The Saiga does not have a lower handguard retainer. So in order to replace the stock handguard, you either need to get a Saiga-specific model (TAPCO makes a Saiga Galil-style handguard that includes a retainer piece) or you will have to add a lower handguard retainer.

Installing a lower handguard retainer can be done in two ways. First,  you can purchase a two-piece retainer that bolts onto your rifle (around $50). Second, you can press off the front sight block and the gas block and install a standard retainer. The first method is expensive and the second option is a lot of work. I found modifying the existing handguard to be the best choice!
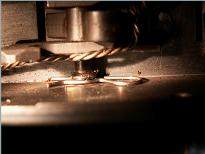
Gas Piston

The gas piston is another relatively easy part to replace. It counts as 1 compliance part. You can use either an AK-47 piston (6 1/4 inches) or an AK-74 piston (5 3/4 in). Just make sure they are US-made to get credit for the compliance part.

Removal of the piston requires drilling out the pins holding it in place. Once the pins are out, you'll probably have to clamp the piston head in a vice to get enough leverage to screw it out. Don't worry -- it won't hurt the piston!  Once you get the old piston out, just screw in the new one and replace the pin. You can buy a specific gas piston pin for about $1, or you can use a small diameter nail and peen the ends over.

Bullet Guide

The bullet guide is necessary for proper feeding of ammo using standard AK mags. Saiga-specific mags have a quasi-bullet guide built into them. You can make your own guide (as shown in the tutorial) or you can buy a machined one for about $25. Installation is easy - just follow the directions and go very slowly when tapping the hole. Breaking off the tap is a sickening feeling (ask me how I know!)

Newer (2007) models of the Saiga 7.62x39 have had thicker trunnions - so you may need a thinner bullet guide to compensate. You'll know if you find you have problems getting rounds to load properly.


.

Other Useful Hints

There are a couple of things I wish I had known before I did my conversions. Here are a few to help you out.

Receiver Painting
When you remove the trigger plate, the receiver underneath will be unfinished. I found that Dupli-Color High Heat Black automotive engine paint was almost an exact match to the color and texture of the factory receiver finish. I picked up a can at AutoZone for about $5.
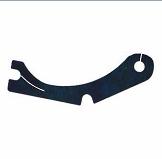
FCG Installation
The FCG is held in place with a spring/wire assembly. GET RID OF IT! There are several easier methods of installation. One is to get a retainer plate. It snaps into place over the trigger and hammer pins and is held in place by the selector lever. They run $10-$15 from typical online stores.

Another option is to use e-clips. They are a little more difficult to install, but still easier than the original spring.

The cheapest (and easiest) option is to get some small cotter-style pin retainers. You can find them at the local home store - just match them to the size of your pins. They install easily and you'll spend around a dollar a piece on them.


.

Click here to see a sample shopping list for a Saiga AK conversion.


Click here for a list of some sources for Saiga AK conversion parts.


Photo by Nalioth
Bolt Hold Open Installation
The single biggest headache with the conversion is reinstalling the BHO device. It's a nice feature, so I think it's worth the hassle. Just do yourself a favor and follow the advice on the Saiga forum by following this link.

If you reinstall the BHO, your hammer will have to be modified to work properly. You will need to remove about 1/8 inch from the leg on the right side of the receiver. That's to provide clearance for the BHO plate. Look at the stock hammer and you'll see that one leg is shorter than the other. Just use a Dremel and grind your hammer to match.


Retainer Plate